In this exercise, you will practice creating a rig for a polygon mesh and adding deformers. Level 1 students will create a simple biped rig starting with this project file. Level 2 and 3 students will create more complex polygonal biped character meshes and rigs.
Learning Resources:
Level 1: Novice Students
Lynda.com: Animation Tools
Lynda.com: Cartoon Rigging
Levels 2 and 3: Intermediate & Experienced Students
Lynda.com: Character Rigging
Levels 3: Experienced Students
Face rigging
Lynda Tutorials: 12 Principles of Animation
Steps to Completion
Choose a either level 1, level 2, or level 3 to complete based on your prior experience with 3D tools. If you are a novice, choose Level 1. If you have some experience, choose Level 2. If you are very experienced with 3D tools, choose Level 3.
| Level 1 Steps | Level 2 Steps | Level 3 Steps |
Level 1:
- Watch the level 1 rigging tutorials.
- Download the base Maya rigging project folder.
- Rename the downloaded project folder to: maya-rigging-YOURSTUDENTID-L1
- Set your project to the downloaded folder.
- Add subdivisions (edge loops) to the polygonal mesh minimizing unwanted distortion that results from moving a joints bound to improperly created geometry. Add geometry to articulate the knee, elbows, and arms.
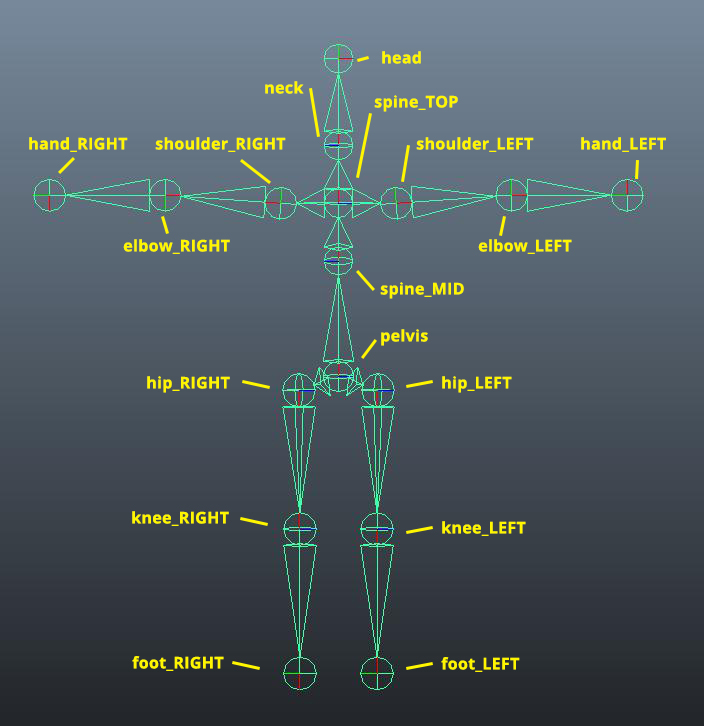
- Create joints for the torso, hips, knees, legs, feet, shoulders, arms, neck, and head. Name and number them for your reference. See image below:
- Smooth bind the joints to the polygonal mesh by selecting both the mesh and the joints, and then choosing, Skin → Bind. Click on ‘Smooth Bind.’
- Use the Component Editor and Paint Skin Weights tool to make adjustments to joint influences.
- Pose the biped to be in natural sitting pose.
- Save your scene as maya-rigging-YOURSTUDENTID in the scenes folder.
- Compress the project folder once you’ve completed the tutorial and rename it maya-rigging-YOURSTUDENTID-L1.zip.
- Upload the .zip file to the submission dropbox
- Ensure you’ve included everything properly. Failure to ensure that you’ve uploaded the file will result in your exercise being graded according the grading criteria.
Example Level 1 folder structure
maya-rigging-YOURSTUDENTID-L1.zip
|
└── maya-rigging-YOURSTUDENTID-L1
    |
    ├── sourceimages/
    ├── sound/
    ├── scripts/
    ├── scenes/
    |   |
    |   └── maya-rigging-YOURSTUDENTID.mb
    |
    ├── renderData/
    ├── particles/
    ├── movies/
    ├── images/
    ├── data/
    ├── clips/
    ├── cache/
    ├── autosave/
    └── assets/
Level 2:
- Watch the level 2 cartoon character animation tutorials.
- Create a new project folder called maya-rigging-YOURSTUDENTID-L2, set your scene to the project folder, and create the sub folders by choosing File → Project Window → Accept.
- Build a simple biped character mesh.
- Create joints, IKs, and controls for the head, arms, and legs.
- Bind your rig to your mesh.
- Create a text animation of your character’s movement, showing the versatility of your rig over 120 frames.
- Save your scene as maya-rigging-YOURSTUDENTID in the scenes folder.
- Compress the project folder once you’ve completed the tutorial and rename it maya-rigging-YOURSTUDENTID-L2.zip.
- Upload the .zip file to the submission dropbox
- Ensure you’ve included everything properly. Failure to ensure that you’ve uploaded the file will result in your exercise being graded according the grading criteria.
Example Level 2 folder structure
maya-rigging-YOURSTUDENTID-L2.zip
|
└── maya-rigging-YOURSTUDENTID-L2
    |
    ├── sourceimages/
    ├── sound/
    ├── scripts/
    ├── scenes/
    |   |
    |   └── maya-rigging-YOURSTUDENTID.mb
    |
    ├── renderData/
    ├── particles/
    ├── movies/
    ├── images/
    ├── data/
    ├── clips/
    ├── cache/
    ├── autosave/
    └── assets/
Level 3:
- Watch the tutorials from the learning resources.
- Create a new project folder called maya-rigging-YOURSTUDENTID-L3, set your scene to the project folder, and create the sub folders by choosing File → Project Window → Accept.
- Create a fully rigged character including a center of gravity control, limb and body part controls, rotation constraints, and set-driven keys.
- Create a 10 second 240 frame animation expressing one of the 12 animation principles.
- Save your scene as maya-rigging-YOURSTUDENTID in the scenes folder.
- Compress the project folder once you’ve completed the tutorial and rename it maya-rigging-YOURSTUDENTID-L3.zip.
- Upload the .zip file to the submission dropbox
- Ensure you’ve included everything properly. Failure to ensure that you’ve uploaded the file will result in your exercise being graded according the grading criteria.
Example Level 3 folder structure
maya-rigging-YOURSTUDENTID-L3.zip
|
└── maya-rigging-YOURSTUDENTID-L3
    |
    ├── sourceimages/
    ├── sound/
    ├── scripts/
    ├── scenes/
    |   |
    |   └── maya-rigging-YOURSTUDENTID.mb
    |
    ├── renderData/
    ├── particles/
    ├── movies/
    ├── images/
    ├── data/
    ├── clips/
    ├── cache/
    ├── autosave/
    └── assets/
Grading
Your grade will be assessed according to the Exercise Grading Criteria.