In this exercise, you will practice uv mapping, lighting, and rendering. There are different tutorials and exercise submission requirements for three experience levels. Choose the experience level that matches your own.

Learning Resources
Tutorials:
Level 1: Novice Students
Lynda.com - Essential Training
Lynda.com - Rendering with Arnold
Level 2: Intermediate Students
Lynda Tutorials - Advanced Modeling
Lynda Tutorials - Rendering with Arnold
Youtube - Creating a seamless backdrop in Maya
Level 3: Experienced Students
Lynda.com - ZBrush Essential Training
Lynda.com - ZBrush Character
Website References
Chair History: Random History
3 Point Lighting: 5M Design Studio
Steps to Completion
Choose a single level to complete based on your level of experience with 3D tools. If you are a novice, choose Level 1. If you have some experience, choose Level 2. If you are very experienced with 3D tools, choose Level 3.
| Level 1 Steps | Level 2 Steps | Level 3 Steps |
Level 1:
- Watch tutorials from Lynda on texturing and lighting.
- Create and set a project folder called lighting-rendering-YOURSTUDENTID-L1.
- Set your project folder by choosing File → Set Project.
- Create your folder structure by choosing File → Project Window → Accept.
- After reading this webpage, create a new scene and create a hi-res polygon model of a chair from one of the mentioned time periods approximately within 4 units wide, high, and deep as well as a patch of ground 10 units wide by 10 units deep by roughly 1 unit high. These can be a single polygonal mesh or modeled as separate objects.
- Create a new perspective called cam1. In the camera attributes, under Film Back, change the Film Gate to 35mm Academy.
- In your Cam1 viewport, enable the Resolution Gate: View → Camera Settings → Resolution Gate.
- Create a standard 3-point lighting setup with three Arnold area lights and name them KeyLight, FillLight, and RimLight. Read More about three point lighting.
- Unfold your UVs using the UV Texture editor other UV tools.
- Apply a texture that you’ve created or found online and name it color-lighting-rendering-YOURSTUDENTID.jpg in the sourceimages folder.
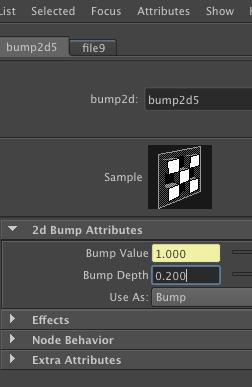
- Create and apply a bump map to your Lambert called bump-lighting-rendering-YOURSTUDENTID.jpg in the sourceimages folder.
- Adjust the Bump Depth to around 0.200 on the bump2d node connected to your bump map channel.
- Enable Arnold as the rendering engine in the render settings.
- Render using Arnold and match the following settings:
Arnold Renderer tab: Sampling
a. Camera (AA): 10
b. Diffuse: 2
c. Glossy: 2
d. Refraction: 0
e. sss: 0
Arnold Renderer tab: Ray Depth
a. Total: 30
b. Diffuse: 8
c. Glossy: 8
d. Reflection: 8
e. Refraction: 0
f. volume: 0
System Tab
a. Progressive Refinement: unchecked
b. Initial Sampling Level: 3
Common Tab
a. Presets: HD 1080 - Position Cam1 so that the object is in the center, filling most of the composition.
- Render the image from Cam1
- From the Arnold Render View, choose Save Image (color-corrected) and save it as render-lighting-rendering-YOURSTUDENTID.jpg in the images folder.
- Save your scene as lighting-rendering-YOURSTUDENTID in the scenes folder.
- Compress the project folder once you’ve completed the tutorial and rename it lighting-rendering-YOURSTUDENTID-L1.zip.
- Upload the .zip file to the submission dropbox.
- Ensure you’ve included everything properly. Failure to ensure that you’ve uploaded the file will result in your exercise being graded according the grading criteria.
Example Level 1 folder structure
lighting-rendering-YOURSTUDENTID-L1.zip
|
└── lighting-rendering-YOURSTUDENTID-L1
    |
    ├── sourceimages/
    |   |
    |   ├── color-lighting-rendering-YOURSTUDENTID.jpg
    |   └── bump-lighting-rendering-YOURSTUDENTID.jpg
    |
    ├── sound/
    ├── scripts/
    ├── scenes/
    |   |
    |   └── lighting-rendering-YOURSTUDENTID.mb
    |
    ├── renderData/
    ├── particles/
    ├── movies/
    ├── images/
    |   |
    |   └── render-lighting-rendering-YOURSTUDENTID.jpg
    |
    ├── data/
    ├── clips/
    ├── cache/
    ├── autosave/
    └── assets/
Level 2:
- Watch the Lynda tutorials on lighting and rendering.
- Duplicate your project folder from the last exercise and rename it to lighting-rendering-YOURSTUDENTID-L2.
- Save each of the three scenes in the scenes folder as:
obj1-lighting-rendering-YOURSTUDENTID
obj2-lighting-rendering-YOURSTUDENTID
obj3-lighting-rendering-YOURSTUDENTID - Ensure all of your objects are using a mia_material_x material with your textures. (introducing the mia_material)
- Compose your objects in their respective scenes
- Create a new perspective called cam1. In the camera attributes, in Film Back, change the Film Gate to 35mm Academy.
- In your Cam1 viewport, enable the Resolution Gate: View → Camera Settings → Resolution Gate.
- Create a standard 3-point lighting setup with three area lights and name them KeyLight, FillLight, and RimLight. Read More about three point lighting.
- Create a backdrop for your models Tutorial (You may use the same one in each scene by exporting the backdrop as an FBX).
- In the material attributes for each material, enable ambient occlusion.
- Save your color texture maps in the sourceimages folder as:
color1-lighting-rendering-YOURSTUDENTID.jpg
color2-lighting-rendering-YOURSTUDENTID.jpg
color3-lighting-rendering-YOURSTUDENTID.jpg - Add surface details with bump maps. Save your bump texture maps in the sourceimages folder as:
bump1-lighting-rendering-YOURSTUDENTID.jpg
bump2-lighting-rendering-YOURSTUDENTID.jpg
bump3-lighting-rendering-YOURSTUDENTID.jpg - Render using Arnold and match the following settings:
Arnold Renderer tab: Sampling
a. Camera (AA): 10
b. Diffuse: 2
c. Glossy: 2
d. Refraction: 0
e. sss: 0
Arnold Renderer tab: Ray Depth
a. Total: 30
b. Diffuse: 8
c. Glossy: 8
d. Reflection: 8
e. Refraction: 0
f. volume: 0
System Tab
a. Progressive Refinement: unchecked
b. Initial Sampling Level: 3
Common Tab
a. Presets: HD 1080 - Position Cam1 so that the object is in the center, filling most of the composition.
- Render your three scenes from Cam1 and save them in the images folder.
render1-lighting-rendering-YOURSTUDENTID.jpg
render2-lighting-rendering-YOURSTUDENTID.jpg
render3-lighting-rendering-YOURSTUDENTID.jpg - Compress the project folder once you’ve completed the tutorial and rename it lighting-rendering-YOURSTUDENTID-L2.zip.
- Upload the .zip file to the submission dropbox.
- Ensure you’ve included everything properly. Failure to ensure that you’ve uploaded the file will result in your exercise being graded according the grading criteria.
Example Level 2 folder structure
lighting-rendering-YOURSTUDENTID-L2.zip
|
└── lighting-rendering-YOURSTUDENTID-L2
    |
    ├── sourceimages/
    |   |
    |   ├── bump1-lighting-rendering-YOURSTUDENTID.jpg
    |   ├── bump2-lighting-rendering-YOURSTUDENTID.jpg
    |   ├── bump3-lighting-rendering-YOURSTUDENTID.jpg
    |   ├── color1-lighting-rendering-YOURSTUDENTID.jpg
    |   ├── color2-lighting-rendering-YOURSTUDENTID.jpg
    |   └── color3-lighting-rendering-YOURSTUDENTID.jpg
    |
    ├── sound/
    ├── scripts/
    ├── scenes/
    |   |
    |   ├── obj1-lighting-rendering-YOURSTUDENTID.mb
    |   ├── obj2-lighting-rendering-YOURSTUDENTID.mb
    |   └── obj3-lighting-rendering-YOURSTUDENTID.mb
    |
    ├── renderData/
    ├── particles/
    ├── movies/
    ├── images/
    |   |
    |   ├── render1-lighting-rendering-YOURSTUDENTID.jpg
    |   ├── render2-lighting-rendering-YOURSTUDENTID.jpg
    |   └── render3-lighting-rendering-YOURSTUDENTID.jpg
    |
    ├── data/
    ├── clips/
    ├── cache/
    ├── autosave/
    └── assets/
Level 3:
- Watch the Essential Training and Digital Character Creation tutorials from Lynda on modeling with ZBrush through to the end.
- Using the techniques learned in the Digital Creature Creation tutorials, continue working on your model.
- Complete the your image to the level of finish of the tutorial’s final result. Instead of rendering an animated turntable, render four images (Top, Side, Front, 3/4 view) and name them:
top-lighting-rendering-YOURSTUDENTID.jpg
side-lighting-rendering-YOURSTUDENTID.jpg
front-lighting-rendering-YOURSTUDENTID.jpg
quarter-lighting-rendering-YOURSTUDENTID.jpg - Compress the project folder once you’ve completed the tutorial and rename it lighting-rendering-YOURSTUDENTID-L3.zip.
- Upload the .zip file to the submission dropbox.
- Ensure you’ve included everything properly. Failure to ensure that you’ve uploaded the file will result in your exercise being graded according the grading criteria.
Example Level 3 folder structure
lighting-rendering-YOURSTUDENTID-L3.zip
|
└── lighting-rendering-YOURSTUDENTID-L3
    |
    ├── sourceimages/
    ├── sound/
    ├── scripts/
    ├── scenes/
    |   |
    |   └── lighting-rendering-YOURSTUDENTID.mb
    |
    ├── renderData/
    ├── particles/
    ├── movies/
    ├── images/
    |   ├── top-lighting-rendering-YOURSTUDENTID.jpg
    |   ├── side-lighting-rendering-YOURSTUDENTID.jpg
    |   ├── front-lighting-rendering-YOURSTUDENTID.jpg
    |   └── quarter-lighting-rendering-YOURSTUDENTID.jpg
    |
    ├── data/
    ├── clips/
    ├── cache/
    ├── autosave/
    └── assets/
Grading
Your grade will be assessed according to the Exercise Grading Criteria.