Exercise Details
In this exercise, you will practice creating transparency masks and layered textures.
Learning Resources
Tutorials:
** Level 1 and 2: Novice and Intermediate**
Digital Tutors via Youtube:** **Creating a Layered Texture
**Level 3: Experienced Students**
** Digital Tutors: **Subsurface Scattering
Vimeo: [Creating a subsurface texture with a mia_material](http://www.google.com/url?q=https%3A%2F%2Fvimeo.com%2F21581543&sa=D&sntz=1&usg=AFQjCNHrLZk_D3vaboq47FiEruNEgFOAMA)
Vimeo: Creating layered mia-materials
Steps to Completion
Choose a single level to complete based on your level of experience with 3D tools. If you are a novice, choose Level 1. If you have some experience, choose Level 2. If you are very experienced with 3D tools, choose Level 3.
Level 1 and 2:
1) Watch tutorials on creating layered shaders.
2) Create a new project folder called ex_5_yourstudentID_L1_2.
3) Set your project folder by choosing File → Set Project.
4) Create your folder structure by choosing File → Project Window → **Accept**.
5) Create a high res polygon mesh model of a cup (any kind) as if you created it on a pottery wheel.
6) Create a bent ground plane.
7) Create a new perspective camera called *Cam1. *Adjust the film gate in the camera’s attributes to your desired settings.
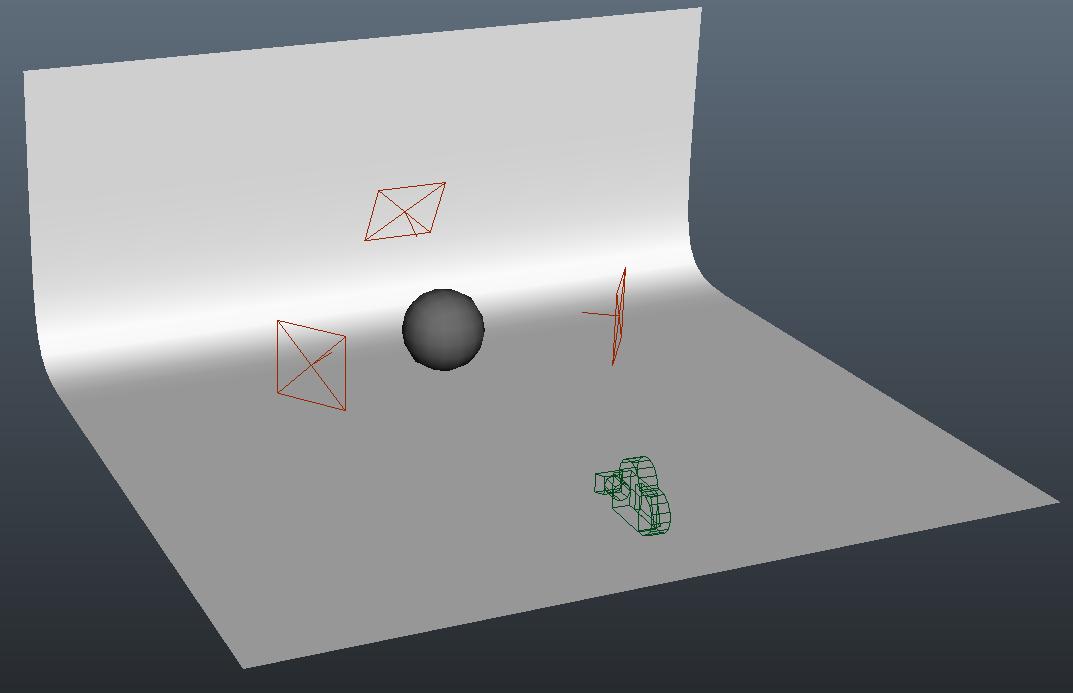
8) Add three area lights to the scene to create a 3-point lighting set-up.
Your scene should be similar to the below screenshot:

9) Create a UV Map, and use the UV Texture Editor to fine tune the UVs. Cylindrical mapping via Create UVs → Cylindrical Mapping might be a good starting point. Save the UV Snapshot (1024px by 1024px) as uv_ex_5_yourstudentID_L1_2.jpg in the sourceimages folder.
10) Using your UV Map as a guide, create a diffuse texture and a bump texture and save them within the sourceimages folder as: bump_ex_5_yourstudentID_L1_2.jpg diffuse_ex_5_yourstudentID_L1_2.jpg
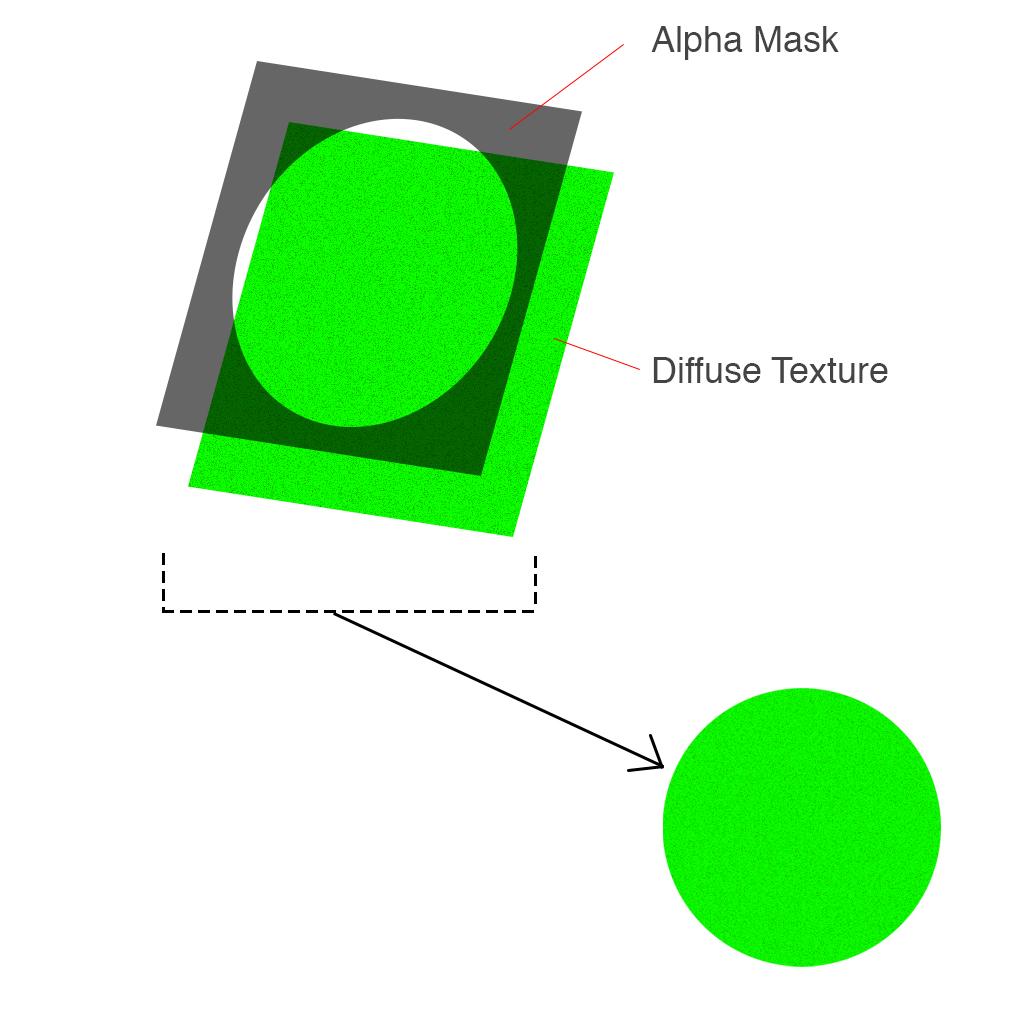
11) Create two black and white alpha mask textures in Photoshop of a “solid graphic pattern” and “fine details,” and save them within the sourceimages folder as: mask_detail_ex_5_yourstudentID_L1_2.jpg mask_pattern_ex_5_yourstudentID_L1_2.jpg
12) Create three Lambert materials and one layered shader.
13) Add your materials to the Layered Shader in the following order:
Layered Shader:
Lambert 1: (leftmost material)
Color: Any Color
Transparency Channel - Dirt Mask
Lambert 2: (middle position)
Color: Any Color
Transparency Channel: Pattern Mask
Lambert 3: (rightmost material)
Color: Diffuse Texture
Bump: Bump Texture
14) Ensure you add your Layered Shader to your polygonal object.
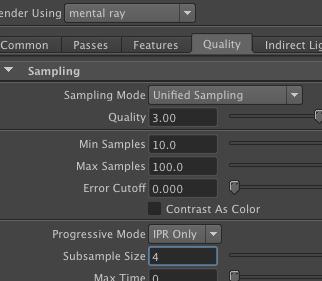
15) Enable following features and settings:


16) Position the new perspective camera so that you have the desired composition.
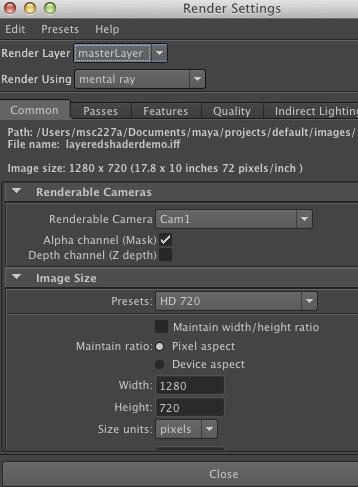
17) Click render to create a 1920px by 1080px JPG image from Cam1 and save it as render_ex_5_yourstudentID_L1_2.jpg in your project’s images folder.
18) Save your scene as ex_5_yourstudentID_L1_2 in the scenes folder.
19) Compress the project folder once you’ve completed the tutorial and rename it ex_5_yourstudentID_L1_2.zip.
20) Upload the .zip file to Lore → Calendar → Exercise 5.
21) Download and unzip the file that you uploaded to ensure you’ve included everything properly. Failure to ensure that you’ve uploaded the file will result in your exercise being graded as a late submission, or a 50% reduction in your grade.
Note: If your masks are not working, use the Alpha as Luminance setting: Mask Texture File Node → Color Balance → Alpha as Luminance
Level 3:
1) Watch tutorials on creating layered shaders.
2) Create a new project folder called ex_5_yourstudentID_L3.
3) Set your project folder by choosing File → Set Project.
4) Create your folder structure by choosing File → Project Window → **Accept**.
5) Create a high res polygon mesh model of a coffee mug as if you created it on a pottery wheel.
6) Create a bent ground plane.
7) Create a new perspective camera called *Cam1. *Adjust the film gate in the camera’s attributes to your desired settings.
8) Add three area lights to the scene to create a 3-point lighting set-up.
Your scene should be similar to the below screenshot:
9) Create a UV Map, and use the UV Texture Editor to fine tune the UVs. Cylindrical mapping via Create UVs → Cylindrical Mapping might be a good starting point. Save the UV Snapshot (1024px by 1024px) as uv_ex_5_yourstudentID_L3.jpg in the sourceimages folder.
10) Using your UV Map as a guide, create a diffuse texture and a bump texture and save them within the sourceimages folder as: bump_ex_5_yourstudentID_L3.jpg diffuse_ex_5_yourstudentID_L3.jpg
11) Create two black and white alpha mask textures in Photoshop of a graphic pattern and dirt, and save them within the sourceimages folder as: mask_dirt_ex_5_yourstudentID_L3.jpg mask_pattern_ex_5_yourstudentID_L3.jpg
12) Create three mia_material_x materials, three surface shaders, and one layered shader.
13) Add your materials to the Layered Shader in the following order:
Layered Shader:
surface shader 1: (leftmost material)
mia_material_x 1:
Color: Any Color
Transparency Channel - Dirt Mask
surface shader 2: (middle position)
mia_material_x 2:
Color: Any Color
Transparency Channel: Pattern Mask
surface shader 3: (rightmost material)
mia_material_x 3:
Color: Diffuse Texture
Bump: Bump Texture
14) Enable Ambient Occlusion on each mia_material_x in Material Attributes.
15) Ensure you add your Layered Shader to your polygonal object.
16) Enable following features and settings:


17) Position the new perspective camera so that you have the desired composition.
18) Click render to create a 1280px by 720px JPG image from Cam1 and save it as render_ex_5_yourstudentID_L3.jpg in your project’s images folder.
19) Save your scene as ex_5_yourstudentID_L3 in the scenes folder.
20) Compress the project folder once you’ve completed the tutorial and rename it ex_5_yourstudentID_L3.zip.
21) Upload the .zip file to Lore → Calendar → Exercise 5.
22) Download and unzip the file that you uploaded to ensure you’ve included everything properly. Failure to ensure that you’ve uploaded the file will result in your exercise being graded as a late submission, or a 50% reduction in your grade.
Grading
Your grade will be assessed according to the Exercise Grading Criteria.