In this exercise, you will gain basic understanding of modeling fundamentals. There are different tutorials and exercise submission requirements for three experience levels. Choose the experience level that matches your own.
Learning Resources
Tutorials:
Level 1: Novice Students
Lynda.com - Modeling with Polygons
Lynda.com - Modeling with Nurbs
Level 2: Intermediate Students
Lynda.com - Modeling with Polygons
Lynda.com - Modeling with Nurbs
Level 3: Experienced Students
Lynda.com - ZBrush Essential Training (Lessons 1- 7)
Lynda.com - ZBrush Character (Lessons 1 - 3)
Digital Tutors - Introduction to Z-Brush
Reference Websites
More Information:
Textbook: Introducing Autodesk Maya 2016
Chapter 4 and Chapter 5
Textbook: Mastering Autodesk Maya 2016
Chapter 3 and Chapter 4
Steps to Completion
Choose a either level 1, level 2, or level 3 to complete based on your prior experience with 3D tools. If you are a novice, choose Level 1. If you have some experience, choose Level 2. If you are very experienced with 3D tools, choose Level 3.
Level 1 Steps | Level 2 Steps | Level 3 Steps
Level 1:
- Watch tutorials from Lynda on modeling with Polygons and Nurbs.
- Download these project files and use the scene file as the starting point and rename the project folder to : modeling-YOURSTUDENTID.
- Set your project to the downloaded folder by choosing File → Set Project.
- Model the airplane from the reference images with your newly learned modeling skills with polygons. (Be careful not to accidentally create nurbs primitives when modeling)
- Skills to practice include:
- ploygonal edge flow
- extruding polygon faces
- inserting edge loops
- moveing, rotating, and scaling vertecies, edges, and faces
- mirroring and duplicating geometry
- Skills to practice include:
- Save your scene as modeling-YOURSTUDENTID in the scenes folder.
- Compress the project folder once you’ve completed the tutorial and rename it modeling-YOURSTUDENTID-L1.zip.
- Upload the .zip file to the submission dropbox
- Ensure you’ve included everything properly. Failure to ensure that you’ve uploaded the file will result in your exercise being graded according the grading criteria.
Example Level 1 folder structure
modeling-YOURSTUDENTID-L1.zip
|
└── modeling-YOURSTUDENTID-L1
    |
    ├── sourceimages/
    |   |
    |   └── reference images/
    |       |
    |       ├── front.jpg
    |       ├── side.jpg
    |       └── top.jpg
    |
    ├── sound/
    ├── scripts/
    ├── scenes/
    |   |
    |   └── modeling-YOURSTUDENTID.mb
    |
    ├── renderData/
    ├── particles/
    ├── movies/
    ├── images/
    ├── data/
    ├── clips/
    ├── cache/
    ├── autosave/
    └── assets/
Level 2:
- Watch Lynda tutorials on polygonal modeling.
- Obtain three randomly generated objects from this website. Include a screenshot of the website objects in your sourceimages folder called objects-modeling-YOURSTUDENTID}.jpg (or .png)
Create a new project folder with associated sub-folders (File → Project Window → Accept). Create a new scene for each object and save in the scenes folder.
Naming:
obj1-modeling-YOURSTUDENTID
obj2-modeling-YOURSTUDENTID
obj3-modeling-YOURSTUDENTIDCreate 3 reference image planes for each object with pencil and paper or in Photoshop. Set up the image reference planes in their respective scenes files. Ensure they are square. Place them in the sourceimages → referenceimages folder. Instructions for aligning reference images in Photoshop: Naming:
obj1-side-modeling-YOURSTUDENTID.jpg
obj1-front-modeling-YOURSTUDENTID.jpg
obj1-top-modeling-YOURSTUDENTID.jpg
obj2-side-modeling-YOURSTUDENTID.jpg
obj2-front-modeling-YOURSTUDENTID.jpg
obj2-top-modeling-YOURSTUDENTID.jpg
obj3-side-modeling-YOURSTUDENTID.jpg
obj3-front-modeling-YOURSTUDENTID.jpg
obj3-top-modeling-YOURSTUDENTID.jpgCreate one polygonal model for each scene file from your set of randomly generated objects in Step 2. (You should be making three objects since you’ve created three scenes.)
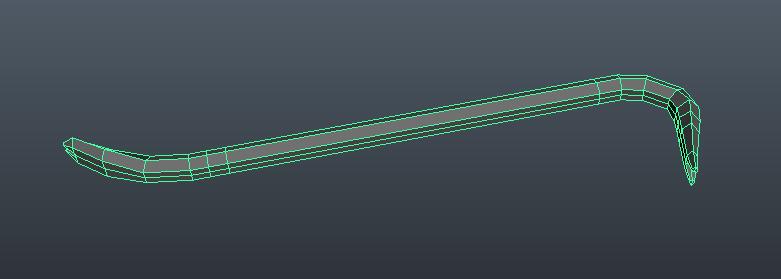
Capture the gesture of the objects with as little detail as needed to describe the shape.
- Do not "smooth" the objects.
- Focus on maintaining quads and organized edgeflow.
See example image of a crowbar below:

Compress the project folder once you’ve completed the tutorial and rename it modeling-YOURSTUDENTID-L2.zip.
Upload the .zip file to the submission dropbox
Ensure you’ve included everything properly. Failure to ensure that you’ve uploaded the file will result in your exercise being graded according the grading criteria.
Example Level 2 folder structure
modeling-YOURSTUDENTID-L2.zip
|
└── modeling-YOURSTUDENTID-L2
    |
    ├── sourceimages/
    |   |
    |   ├── objects-modeling-YOURSTUDENTID.jpg
    |   |
    |   └── referenceimages/
    |       |
    |       ├── obj1-front-modeling-YOURSTUDENTID.jpg
    |       ├── obj1-side-modeling-YOURSTUDENTID.jpg
    |       ├── obj1-top-modeling-YOURSTUDENTID.jpg
    |       ├── obj2-front-modeling-YOURSTUDENTID.jpg
    |       ├── obj2-side-modeling-YOURSTUDENTID.jpg
    |       ├── obj2-top-modeling-YOURSTUDENTID.jpg
    |       ├── obj3-front-modeling-YOURSTUDENTID.jpg
    |       ├── obj3-side-modeling-YOURSTUDENTID.jpg
    |       └── obj3-top-modeling-YOURSTUDENTID.jpg
    |
    ├── sound/
    ├── scripts/
    ├── scenes/
    |   |
    |   ├── obj1-modeling-YOURSTUDENTID.mb
    |   ├── obj2-modeling-YOURSTUDENTID.mb
    |   └── obj3-modeling-YOURSTUDENTID.mb
    |
    ├── renderData/
    ├── particles/
    ├── movies/
    ├── images/
    ├── data/
    ├── clips/
    ├── cache/
    ├── autosave/
    └── assets/
Level 3:
- Watch tutorials from Lynda on modeling with ZBrush.
- Using the techniques learned in the Digital Creature Creation tutorials, create a Sea Creature.
- Your ZBrush model should be of similar refinement to the model in Digital Creature Creation, by the end of Lesson 3.
- Take a screenshot of your model and rename the image as modeling-YOURSTUDENTID.png.
- Save your image in a project folder modeling-YOURSTUDENTID-L3.
- Compress the folder once you’ve completed the tutorial and rename it modeling-YOURSTUDENTID-L3.zip.
- Upload the .zip file to the submission dropbox
- Ensure you’ve included everything properly. Failure to ensure that you’ve uploaded the file will result in your exercise being graded according the grading criteria.
Example Level 3 folder structure
modeling-YOURSTUDENTID-L3.zip
|
└── modeling-YOURSTUDENTID-L3
    |
    └──modeling-YOURSTUDENTID.png
Grading
Your grade will be assessed according to the Exercise Grading Criteria.